


Blending Photos in Photoshop
Blending photos in Photoshop is some cool effect we love to do to create some panorama image or to make some valuable photos memorable. Well, whatever the reason you need this effect for; in this tutorial we will make blending photos in Photoshop pretty easy, so now we are going to start.

Step (1): Open your image in Photoshop. Notice that your image is the background layer.
Step (2): Make a copy of your image so it is not a background layer, and make your background layer invisible by clicking once on the eye icon next to it.
Step (3): Now drag the other photo in your workspace. That will add the other photo to a new layer above the first one as shown in the following image.

Step (4): Adjust your photos so that one of the photos overlaps the other one.
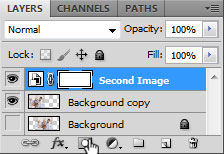
Step (5): Select the upper photo layer, and the click on “Add Layer Mask” icon which is a white circle on a gray background. As shown below, a white thumbnail will appear next on the upper photo layer. That is the layer mask.
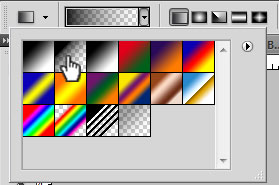
Step (6): Select the layer mask thumbnail by clicking once on it, and set your foreground color to black. Now select the gradient tool (G), and set the foreground to transparent gradient. Check the image below for guidance.
Step (7) (final step): Apply the gradient tool (G) effect by clicking on the left edge of your upper photo, and dragging the mouse to the right while holding down the shift key. Release the mouse, and you are Done!
Now you can blend two pictures together using our tutorial “Blending Photos In Photoshop”. It is a very nice effect, and easy to apply. This is the end of Blending Photos In Photoshop tutorial. Thank you for your time. Please check the rest of our tutorials, and always feel free to ask any related question by sending us at support@gasarts.com